This post is about how we at Stack built a browser using ElectronJS.
If you're curious why we chose ElectronJS in the first place, I've written about our journey here: Technology Behind Stack Browser
Stack Browser as its original form is no longer maintained. However @Ziko is working on a newer version - @SkyOS. Follow him along on his journey!
I'll skip the basics and assume you're already familiar with ElectronJS and how the main and renderer processes work.
Alright, let's dive in.
How to display web content
In Electron, UI typically lives in the renderer process as a standard web app. However, when building a browser, we need to display the content of websites that users visit. For this the BrowserView component is the best option.
That wasn’t always the case, though. In the past, the only option was the <WebView> tag (which worked like an iframe). If you’re curious why BrowserView is a better alternative, Figma and Slack have good posts about it:
What is a BrowserView
A BrowserView is a native component managed by the main process. You can position it on the screen by giving coordinates and a size. And it can load a web content. That’s essentially all it can do.
const { app, BrowserView, BrowserWindow } = require('electron')

app.whenReady().then(() => {
  const win = new BrowserWindow({ ... })

  const view = new BrowserView()
  win.setBrowserView(view)

  view.setBounds({ x: 0, y: 0, width: 300, height: 300 })
  view.webContents.loadURL('https://electronjs.org')
})
A key thing to understand is that the BrowserView sits above everything else, which means the entire UI running as a web app in the renderer process gets buried behind it.
UI elements that need to appear above the web-site content - such as dropdowns, command bars, or floating sidebars - cannot be part of the document running in the renderer process.
This post is purely about how we solved this challenge.
The BrowserView API is now deprecated and has been replaced by WebContentsView. While the API differs slightly, the core idea remains the same. I’ll be referring to BrowserView throughout this post, as it’s easier for me to explain the concepts and show some snippets.*
Layering UI elements
In a regular web app, layering elements is simple because everything exists within the same document flow, and you can control the stacking order with z-index. But when a BrowserView sits above everything else, things get tricky.
Let’s take a simple example: we want to build a browser that only displays one website. It features a topbar, with a dropdown menu in the right corner. (This is actual MVP that we created in the beginning)
At first we created a simple web app in the renderer process with only a <Topbar> component positioned at the top, occupying 50px in height.
Then, in the main process, we created a BrowserView instance that occupies the remaining screen space, starting just below the topbar.
The button to open a dropdown is part of our Topbar component. But how do we make sure that the dropdown content doesn’t get buried behind the BrowserView?
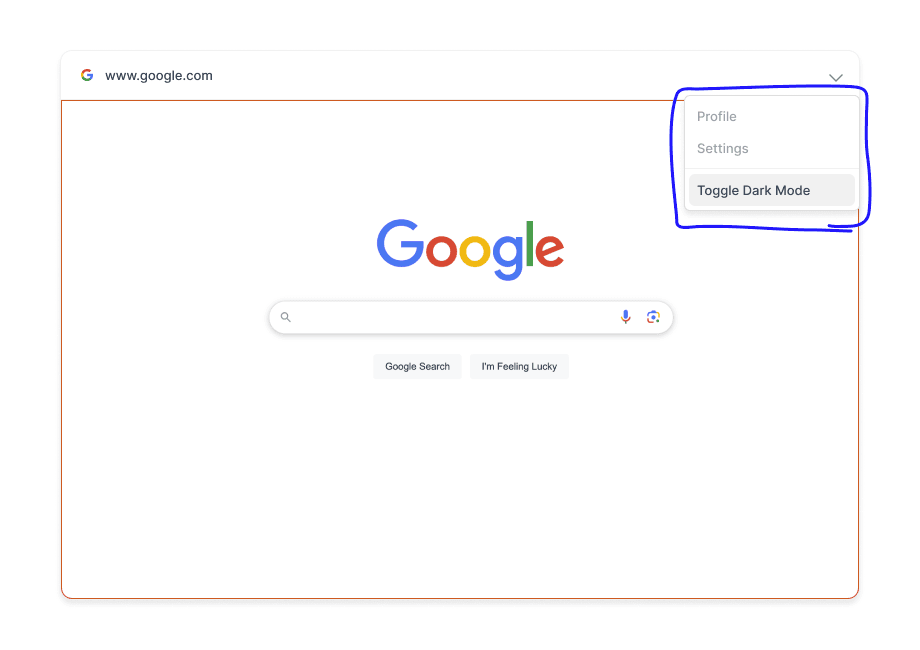
Guess what... we used another BrowserView
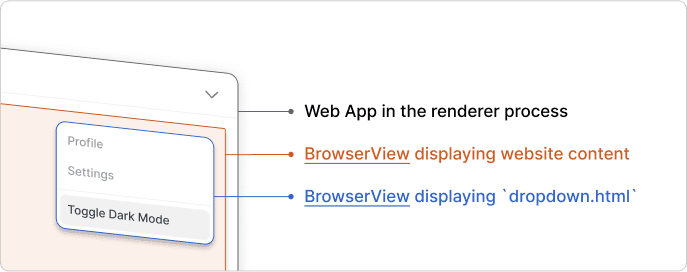
BrowserViews are great for displaying websites, but they can actually render any web content.
This means we could create a new BrowserView, position it precisely where the dropdown should appear, and use it to render only the dropdown’s content.
For our MVP, we created a separate dropdown.html file with its own styles, just like a standalone webpage. Then, we created a second BrowserView with a transparent background, loaded our dropdown.html, and positioned it directly on top of the existing BrowserView that was displaying the website content.
This opened new doors. We could create BrowserViews for every floating UI element. But as you might imagine it comes with a whole chain of challenges:
-
How to distribute different parts of the UI in BrowserViews? How do they communicate with each other? How do you keep their states in sync?
For example, say we have a dropdown item to toggle dark mode. When the user clicks it, the topbar should switch to dark. How do we ensure this happens smoothly?
Managing these interactions becomes a major architectural challenge — one that requires a solid strategy for state management and cross-view communication.
-
How to manage the layout. BrowserView only allows us to set its size and position on the screen, but that’s about it. Unlike regular HTML elements, there’s no built-in layout system, no CSS flexbox, no z-index. Manually updating coordinates every time something changes quickly becomes a nightmare.
Instead hardcoding sizes and coordinates for every BrowserView, we wanted a system that could dynamically adjust everything based on the app’s structure.
This problems are independent from each other, but let’s start with the first one:
Distributing UI Across BrowserViews
As already mentioned, BrowserView can display any web content — it can load a URL, render a local HTML file, or even reuse an existing WebContents instance.
Meanwhile, in the renderer process, we can create new windows using window.open(). Normally this opens a separate window, but we only need its WebContents instance.
By combining these two pieces of the puzzle here’s what we do:
-
When the user clicks the dropdown trigger, a new window opens, and the dropdown content is rendered inside it.
-
In the main process, we intercept the window creation before it appears, extract its
WebContentsinstance, and embed it into a separate BrowserView, positioning it exactly where needed.
Ok, let’s go through this steps in more details.
Distribute UI in sub windows
In JavaScript, the parent window has full access to the document of opened child windows.
const dropdownWindow = window.open('');
dropdownWindow.document.body.innerText = 'Yoo from the parent';
Using React Portals it gets more interesting. You can project any part of the React component in another window.
Take a look at the following example.
function Topbar() {

 const [isDark, toggleTheme] = useReducer(s => !s, false);

 return <Container dark={isDarkMode}>
  <Title>...</Title>

  <Dropdown>
   <Dropdown.Trigger>...</Dropdown.Trigger>

   //👇👇👇
   <PortalWindow>
    <Dropdown.Content>
     <Button onClick={toggleTheme}>Toggle Dark Mode</Button>
    </Dropdown.Content>
   <PortalWindow>
  </Dropdown>

 </Container>
}
In this snippet, we have a <Topbar> component containing both the dropdown trigger and the dropdown content. The dropdown trigger is part of the topbar as expected, but the dropdown content is rendered in a new window. This is achieved by wrapping the dropdown content inside our custom <PortalWindow> component, which moves it out of the normal document flow and into a separate window.
This article by David Gilbertson explains the technique very nicely
This way we don’t need to create separate dropdown.html file, instead it simply becomes one small part of a component.
Now let’s move to the second part of the puzzle:
Intercepting window.open in the main process
Instead of letting window.open() to create an actual window, we intercept it in the main process, take its WebContents, embed it into a BrowserView instead and position it based on our needs.
// in the renderer process:
window.open('','dropdown')

// in the main process:
mainWindow.webContents.removeAllListeners('-add-new-contents')
mainWindow.webContents.addListener(
  '-add-new-contents',
  (event, webContents, ...args) => {
    const dropdownView = new BrowserView({ webContents })

    dropdownView.setBounds({
      x: 500,
      y: 30,
      width: 300,
      height: 800,
    })

    mainWindow.addBrowserView(dropdownView)
    mainWindow.setTopBrowserView(dropdownView)

  },
)
The -add-new-contents event isn’t officially documented, but it works. It was introduced by @sentialx, who has made many great contributions to Electron, particularly for building browsers.
Putting it all together
- We have one React app running in the renderer process, the way you’d normally use Electron.
- This app holds the entire UI state and behaves like a regular web app.
- It opens bunch of windows for each floating UI component - like dropdown, modals, tooltips, sidebar - by simply wrapping them inside
<PortalWindow> - In the main process, we intercept opening a window before it appears, steal its
WebContentand put it into a newBrowserView - And we position the
BrowserViewwhere it belongs.
This way we can overlay BrowserViews on top of each other as much as we like by having our dev experience to be almost identical to normal web app development.
Few additional gotchas:
-
The new windows we create don’t automatically inherit styles from our main app. Even though the components inside them work fine, they look completely unstyled html.
We used Styled Components, which provides an easy way to inject styles of the specific DOM tree into given element instead of main documents
<head>. So the solution to this problem was simply a “one-liner”.// in our PortalWindow.ts <StyleSheetManager target={myWindow.document.head}> {createPortal(children, myWindow.document.body)} </StyleSheetManager> -
Another challenge was registering global keyboard shortcuts. We had to make sure that all windows captured keystrokes individually, because depending where you click different window gets activated. We solved this by listening to
before-input-eventin the main process, but there are possibly other ways. -
Debugging is pretty much the same as in a normal web app. The only difference is that we had to make sure to open a dev tools of the right “window” when inspecting styles. Not a big deal.
-
Performance was noticeably slow when opening new windows. To make it feel instant, we pre-opened a few empty windows and reused them instead of calling window.open every time a dropdown was opened.
-
Unfortunately there’s no z-index for layering BrowserViews. The only way to control stacking is by using
mainWindow.setTopBrowserView(view), which gets a bit tricky when managing multiple layers. In the end, we addedzIndexproperty to the BrowserView in our forked version of ElectronJS.
Layout Management
UI of Stack Browser is quite complex. We ended up having all our UI elements in their own BrowserViews. This includes topbars, spacebar, modals, dropdowns, tooltips, command bar, event a small bar for link previews, and many other elements.
As you might imagine, managing positions of all these elements by simply hardcoding them would've been a nightmare.
To solve this, we used Facebook Yoga layout engine with a flavor similar to React Native.
Using Facebook Yoga
Yoga provides a javascript API to describe a layout of nodes using flexbox-like syntax. Based on this description, then you can calculate positions and sizes of any node.
API looks like this:
import Yoga, {Edge, FlexDirection, PositionType} from 'yoga-layout';

const root = Yoga.Node.create();
root.setFlexDirection(FlexDirection.Row);
root.setWidth(100);
root.setHeight(100);

const child0 = Yoga.Node.create();
child0.setFlexGrow(1);
child0.setMargin(Edge.Right, 10);
root.insertChild(child0, 0);

const child1 = Yoga.Node.create();
child1.setFlexGrow(1);
root.insertChild(child1, 1);

// reading the result
child1.getComputedLeft()
child1.getComputedTop()
child1.getComputedWidth()
child1.getComputedHeight()
We created <View> component to abstract yoga node creation. <View> can be nested to create complex layouts. Then, we always use our <PortalWindow> component as a direct child of <View>. It grabs the size and position of its parent <View> yoga node and applies it to the BrowserView instance by sending them to the main process via ipc.
<View ...>
  <View ...>
    <View ...>
      <PortalWindow />
    </View>
  </View>
</View>
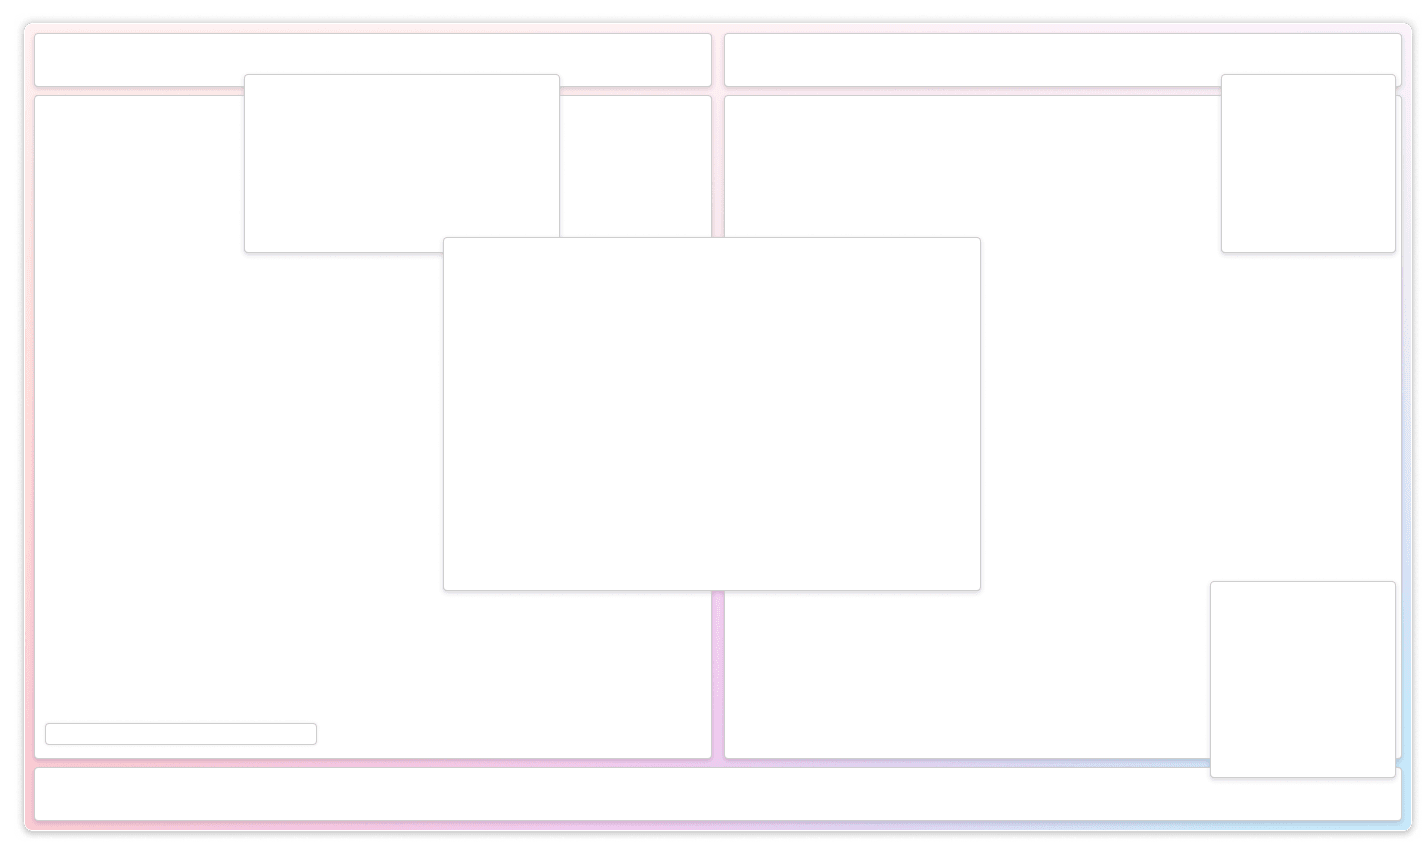
How it works in practice
Following snippet shows the simplified layout of Stack Browser with two cards aligned horizontally and a spacebar at the bottom. Card consists of a topbar and a webview.
function Layout() {
  return <View style={{flex: 1, flexDirection: 'column', padding: 10, gap: 10}}>

    // split screen with two cards
    <View style={{flex: 1, flexDirection: 'row', gap: 10}}>
      <Card />
      <Card />
    </View>

    // spacebar
    <View style={{ width: '100%', height: 80 }}>
      <PortalWindow>
        <Spacebar />
      </PortalWindow>
    </View>

  </View>
}

function Card({children}: {children: React.ReactNode}) {
  return <View style={{flex: 1, flexDirection: 'column', padding: 10}}>

    // topbar
    <View style={{width: '100%', height: 50 }}>
      <PortalWindow>
        <Topbar />
      </PortalWindow>
    </View>

    // website content
    <View style={{width: '100%', height: 'auto' }}>
      <WebView href="https://www.google.com" />
    </View>
  </View>
}
Each topbar and a spacebar are projected into their own BrowserView instances, because they're wrapped in <PortalWindow> tags.
<WebView> tag from the snippet is our custom component that communicates with the main process to position itself in the right places and load the website content. Main process applies this options to the BrowserView instance used for loading websites with isolated partition.
ElectronJS presents tons of challenges when constructing a multi-view browser. Using these techniques we were able to achieve a flexible, performant, and maintainable architecture.
Special thanks to Felix Rieseberg and Sam Maddock for helping us to navigate through this maze.